Tuesday 30 November 2010

Stairs

Since changing the design of my steps due to the toilet tank not fitting I have had to rethink the stairs from the stern deck.

Having never made a stair case before I decided to google it.  Within a few listed results I came a cross a staircase calculator.

I put in the required dimensions and after a bit of fiddling with the settings I got a plan to make the stringer.  I had to fiddle with the settings as the calculator is designed for a building and as we all know boat stairs tend to be steeper.


  I marked it out on a off cut of ply

 I cut it out
 
 Low and behold it worked!

I had to cut a slot in it to go over the bulkhead.  This will now serve as the final template for the staircase.  The first 2 steps down will be folded steel.  This  will finish behind the ply lining, the lower 3 will be made from wood and will join on in front of the ply lining.  All the runners and risers will look the same when finished.  I plan on putting the consumer units under the stairs and making one of them removable for easy access.


Monday 29 November 2010

Insulation Works

I thought I'd share this picture with you.  I have  a 2.5kw electric heater in the boat.  By mid afternoon the roof looked like this.  The heater is sufficient to keep it warm enough to comfortably work inside.


You can clearly see where the roof bearers transmit the heat into the roof.  Just goes to show how well the insulation is working.  I am puzzled as to why there is no snow on the outside of the handrails as there is exactly the same good insulation under all that area.


Sewage Pipe Installled

Today was the given over to fitting the sewage pipe.  With macerator toilet runs its better to have the rise near the toilet not near the end.  My pipe run therefore needed to be as high up under the gunwale as possible.  I had planed this when I was battening up.  Heres how I fixed it in place.

First I needed to make some clamps to hold the tube in place.


Using a hole saw I drilled pairs of 2x1 batton to make the support and fixing brackets below.


Here they are clamping the tube in place

Friday 26 November 2010

De-construction

Has been the general theme this week.

First it was the central heating plumbing.  Then the space I had planned for the toilet tank proved to small by about 40mm.  It would have fitted if it was offered in form the inside out, but there is a bulkhead in the way.  It wouldn't fit from the engine bay because of the geometry of the swim which I must admit I hadn't considered. There was 3 optins to fix this.   Get another tank made, get the current tank altered or remove the step I put in the porch I made a while back.  All of these options had appeal and otherwise, but eventually it was clinched when it became apparent I could get a bigger calorifier in if I removed the step.  That and it was the quickest and cheapest option.  It will mean a different design of internal staircase, but thats not a problem at all.  So armed with trusty plasma cutter, out it came in about 1/2 hour.  All I have to do now is remember its not there and that forgetting this will result in a painful reminder.


While the plasma cutter was out I cut the hole out for the stern tube.


Today was so cold the frost on the boat didn't thaw all day.  Its been so cold that the water I had in the fuel tanks form a while back was frezzing up so I decided to drain it out of each tank.

You can just see it coming from the drain points each side

With the plasma cutter still out I enlarged the holes for the diesel filler caps I have chosen. Finally I have mounted the Mikuni heater so I can finish the C/H plumbing.  

The SS mounting bracket was spot welded in 4 places and to me these seemed to keep it together so I took it to a friend with SS welding set up and got him to fully weld the joints .


My plan was to run this up to test it then take it out again, but I think it might be pressed into service  with a temporary tank to keep me warm inside the boat while I work on it as the winter is defiantly settling in.

Tuesday 23 November 2010

Groundhog Day

I have re-plumbed the central heating with 22mm flow and return.  My knees, well the left one, hurts again now.

Monday 22 November 2010

Waste Of Bloody Time That Was

Having spent a fair bit of time last week fitting the plumbing for the radiators its now all got to come out.   WHY? I hear you say.

Well simple.  The Mikuni heater arrived on Friday with its fitting instructions clearly stating the flow and return must be 22mm.  This was even mentioned independently when I posted on CWF.  On previous advice I was told on such short runs 15mm flow and return would be ample.

So this morning I rang Mikuni technical, and was told that 22mm was the spec.  They did say 15mm would probably be OK but if I experienced problems with the unit short cycling (this buggers them up) they would not be interested if its not done to spec.  So faced with the option of it possibly working, or once the boat is up and running it not working I decided on ballance it was better to rip it out now and start again.  Ho Hum!

On the plus side the starboard side panels were not glued on but the port ones were and with Sickaflex.  That was a fun 2 hours removing them.  Fortunately, with care I managed to remove them without damage.  If you know how well Sickaflex bonds you will understand this. 

On the plus side its simply a case of running it in 22mm.  All the holes are still in the right position as are the pipe supports.  On the down side its another £175 of plumbing bits and I now have best part of 50m of 15mm speedfit pipe in various lengths looking for a home and largish bag of 15mm speedfit fittings.  Ho Hum!


Friday 19 November 2010

Its Been A Expensive Week

I am determined to buy as much as possible before the VAT rate rises in January.  

This week I had to pay my engine and bowthruster and all other parts for the movement & steering of the boat.  That was the big one!  I have also ordered the Victron Multiplus inverter charger, the bathroom, including the shower, toilet and tanks, cabinets and big heated towel rail.  The Mikuni was also paid for this week and was delivered today.

We have decided on the kitchen and just waiting for the quote for that.  Screwfix have done well this week as also.  75m of 15mm speedfit pipe 25m of 22mm pipe and a big bag of fittings.

I have also order a fair bit of "extras" from the Vetus catalogue.  And finally I have been told the oak window frames are ready and need to be paid for.

Phew.  I was going out for a drink, but can't afford it now ;-)


Wednesday 17 November 2010

Its Been A Year Now

Well folks, its been a week over a year now since the hull arrived home.  It would have been nice to have done this post on the day but I only just thought today it must be about a year.

If you haven't read to the start of the blog, this is what it looked like then.


I am very pleased with progress so far.  I initially planned it would be a 2 year project.  Without wishing to jinx anything I would hope for it to be ready to float by late spring or early summer 2011. 

I have nearly everything I need to finish the boat either on order or in stock.  Its my intention to have as much as possible paid for before the VAT rate goes up.  Our second lounge looks like a chandlers shop.


Friday 12 November 2010

Back On Track Again

Following the radiator debacle I am now back on track.  I have all the radiators hung and the plumbing on the port side in.  I have used Speedfit for the plumbing.  Both lines tested and they held 2 bar for 30 minutes each. So, happy with that I have now started fixing the side panels permanently.

The mess on the floor is insulation cut away for the pipes

I have also wired up the port side mains and put in the bow thruster control wire and a heavy duty 7 core cable for the tunnel lights and horn and a few spares.

 Used cable ties stapled to the baton to secure the wires

Sockets are temporary

The wiring will be zoned and fused to 16amps each.  There'll be bedroom, lounge, kitchen sockets, individual kitchen appliances, washing machine which will be acced forn the bathroom and an external  MCB RCD unit for the rear deck.
I have decided to use 12v lighting throughout so these and the other 12v appliances will be on their own consumer unit.

Wednesday 10 November 2010

Yesterday Was A Bad Day

Yesterday was wasted day as a result of the radiator company suppling 2 different pattens of radiator. 

I can't tell you how pissed I was about this, especially as I didn't find out until I had already hung the first 3 and then they couldn't confirm if they could match the wrong ones.  Turns out they can't, so this morning I spent 2 hours searching down the right ones elsewhere.  Also the boat had stared leaking from the roof. 

I thought the boat was fairly well sealed up.  I had waterproof tape (supposedly) sealing the mushroom vent holes in the roof.  Although I hadn't finished the hatch, it too up until a couple of days ago was keeping the weather out.

Then we got a shed load of rain, strong N.E'ly winds and this pushed water under the tape and in the gaps around the hatch.

So today I have silliconed plastic sheet over the holes and finished building the hatch.  I suppose I should have finished it before now but there was no pressing need.  So while waiting for the replacement rads it seemed the obvious job to do.

I feel a bit happier this evening.

Edit to add.......  Looking out of the window this morning I think I'm going to be glad I did what I did yesterday.  Its howling and raining big time.  Probably was a good thing after all that the rads didn't come otherwise I still wouldn't have finished the hatch.


Friday 5 November 2010

Diesel Heater Ordered

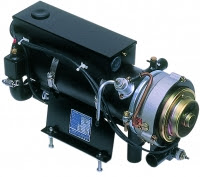
After a lot of reading and deliberation I have decided that this is the heater for me.
It's basically a small central heating boiler that runs off the boats normal diesel fuel.  There are several makes out there, indeed I even have one in my car and it seems all have their fans and foes.  Seems this one has more of the former from the feedback I've had.

Lets hope I have made the right choice.

Now the science bit:-

SPECIFICATIONS:

  • Output:7kw (Hi) 2.4kw (Lo)
  • Voltage: 12V or 24V DC.
  • Power consumption(L/H): (W) 56 (Hi) 49 (Lo)
  • Fuel Consupmtion (L/H): 0.86 (Hi) 0.43 (Lo)
  • Control Temperature: 78 - 80 C
  • Weight: 7.5kg
  • Dimensions: 384L x 178W x 200H (mm)

    1. Description.

    The Mikuni MX60 is a 7kw diesel fired water heater which is suitable for providing hot water for heating purposes via radiators or matrix heaters and also domestic hot water via a calorifier. The Mikuni MX60 is fully automatic in operation featuring glow plug ignition and microprocessor control for full temperature regulation. The heater will cycle automatically between 7kw and 3.5kw depending upon demand, this ensures that the MX60 is very economical in operation. Suitable for boats from 40ft to 50ft.

    2. Marine Applications.

    The Mikuni MX60 is supplied pre-wired with anti – vibration mounts to prevent any resonance through the boat. The kit is complete with full wiring loom and thermostat, exhaust system c/w silencer, lagging and brass through hull fitting, fuel system with copper fuel line, shut off cock and tank standpipe. The water circulation pump is built into the heater body which has a spigot to accept 19mm rubber heater hose.

    3. Installation.

    The fitting kit that is supplied with the Marine version of the Mikuni MX60 heater has been designed to keep installation as simple and quick as possible. The electrics just require connecting to a 12/24 volt D.C. supply and then the cable routing for the timer/stat and on/off switch. All the necessary cables and fuses etc are supplied in the kit. The exhaust pipe is only 28mm diameter O.D. and is manufactured from convoluted flexible stainless steel which is then fitted with a heat resistant glass fibre sleeve. The exhaust pipe is taken by the most direct route to the flue terminal via the stainless steel silencer. The fuel system for the heater is 3/16th copper to comply with the current boat safety scheme and includes stop cock and all necessary compression fittings to complete the installation.

    Kit Contents

    7kw Water Heater, control box, fuel pump, water pump, 3.3 metres fuel pipe, 2 metres exhaust, s/s exhaust silencer, brass exhaust terminal, switch panel, anti-vibration mounts and all clips, fixings etc. with 7 day timer/thermostat


Thursday 4 November 2010

Walls Done.

Its been a few days of making the bulkhead walls, not whole days of course, I have been shopping for ply again and B&Q for radiators and pipe, this once again involved making more templates.  Fortunately the hull is made from computer guided laser cut steel which has very precise location marks.  The result is each side is virtually (within a couple of mm) identical so the template made for one side worked for the other.

This is the template for the front walls
Front starboard

 Fitted

I have left these long as they will be trimmed once the front doors are done.

 Port Side

Rear bulkhead

And finally
The lounge / bathroom wall (bedroom /bathroom wall is the same)

I'm glad thats done I don't like woodwork at the best of times.  I know ply is not "real" wood for the purists but that and MDF is pretty much my limit.  I just think of it as sheet steel, just different cutting tools.
I have spent a lot of time on the loo today, but more of that later.

Wednesday 3 November 2010

What's In The Box?


Rupert's not sure

Still under wraps

My Engine & Gearbox
Vetus DT44 with Hurth ZF45