Friday 27 January 2012

Painting

A very kind break in the weather all be it a few days late enabled me to get some painting done.  The first area tackled was the fore deck.  

The original painting had gone beyond saving so it was a back to metal rubdown. The edges had previously been prepped when the blue spray was done.


Then a coat of primer.


This will do until I put the top grit coat on.

Today it was the turn of some extra blacking (tar based paint).  The side of the boat had become a little scabby with the work done with various painting jobs and the natural weathering that this coating suffers from.

Before

After

Wednesday 25 January 2012

Bottom Draw & Hatch Covers

Remember the days when mostly girls started a bottom draw for the day they would marry and set up their new home.

Well building a new boat is much like setting up a new home.  We however have a bottom draw ROOM.

Pretty much everything in this room is destined for the boat, from furniture to, fire extinguishers and home entertainment stuff to kitchen ware as well as loads of boaty bits like solar panels, ropes, navigation books, even a bloody Rosie & Jim.


Deb is particularly pleased with the cushions that arrived today.


Meanwhile I am still doing all those jobs I've been putting off.  Today is was grinding off the old holding paint on the fore deck ready for final finish which will be nonslip.  Also painted now are the hatches for the weed hatch and mud box and the clamping bars.
Oh and I fitted the cover for the hydraulic steering ram.
(Blue bit with silver screws 9 o'clock)

Wednesday 18 January 2012

Big Snagging List

Well its come to the time to tackle the snagging list of bigger jobs.

These are mainly the jobs I have been putting off, jobs that could wait, jobs that have occurred as a result of modification of improvements.

Today was welding back the drainage channels removed to get the toilet tank out when I thought it was leaking, after which I painted the all the drainage channels.

I need to put another coat of blacking on so I gave the lower part of the boat a good scrub, we have some good weather predicted for the next few days so I will endeavor to get the final coat on.

I have templated the seat covers for the front lockers and I have retrieved from storage the clamps for the mud box and the weed hatch and rubbed them down ready for painting and I've fitted the the stern fender.


Other jobs done are in the engine room area include a connection for the water feed to the Cutlass bearing (white hose), final fixing hoses and wiring.


Installing the driveshaft and water seal and installing the bilge pump.


I have changed the fitting supplied by Vetus because I wanted to put a sea cock this end too, and doing it this was I can use a 14mm ID tube instead of a 10mm tube.

The bilge pump is a new design solid state unit.  Somehow it detects the water level without a float switch.  It's won design awards so I hope it will work if its ever needed.  (Update:-  I had to know, so I dipped it in a bucket of water and it worked.)


So as far as I can see I have finished in the engine room.  No doubt there will be some modifications.  I will probably change the Jubilee clips for superclamps.  Now I have discovered them I much prefer them especially in critical areas.  And I need to repaint it AGAIN!  I think I will wait until  I have a nothing else to do day.a

Wednesday 11 January 2012

Time For A Breather

I have been busy with the oak trimming for the past week and will blog this when I've finished or at least very nearly finished which should be in a few days.

I have to confess I had a carpenter in today to do some tricky stuff which I simply don't have the tools for.  Remember I don't do wood.  Having said that he actually said I'd done a pretty good job.

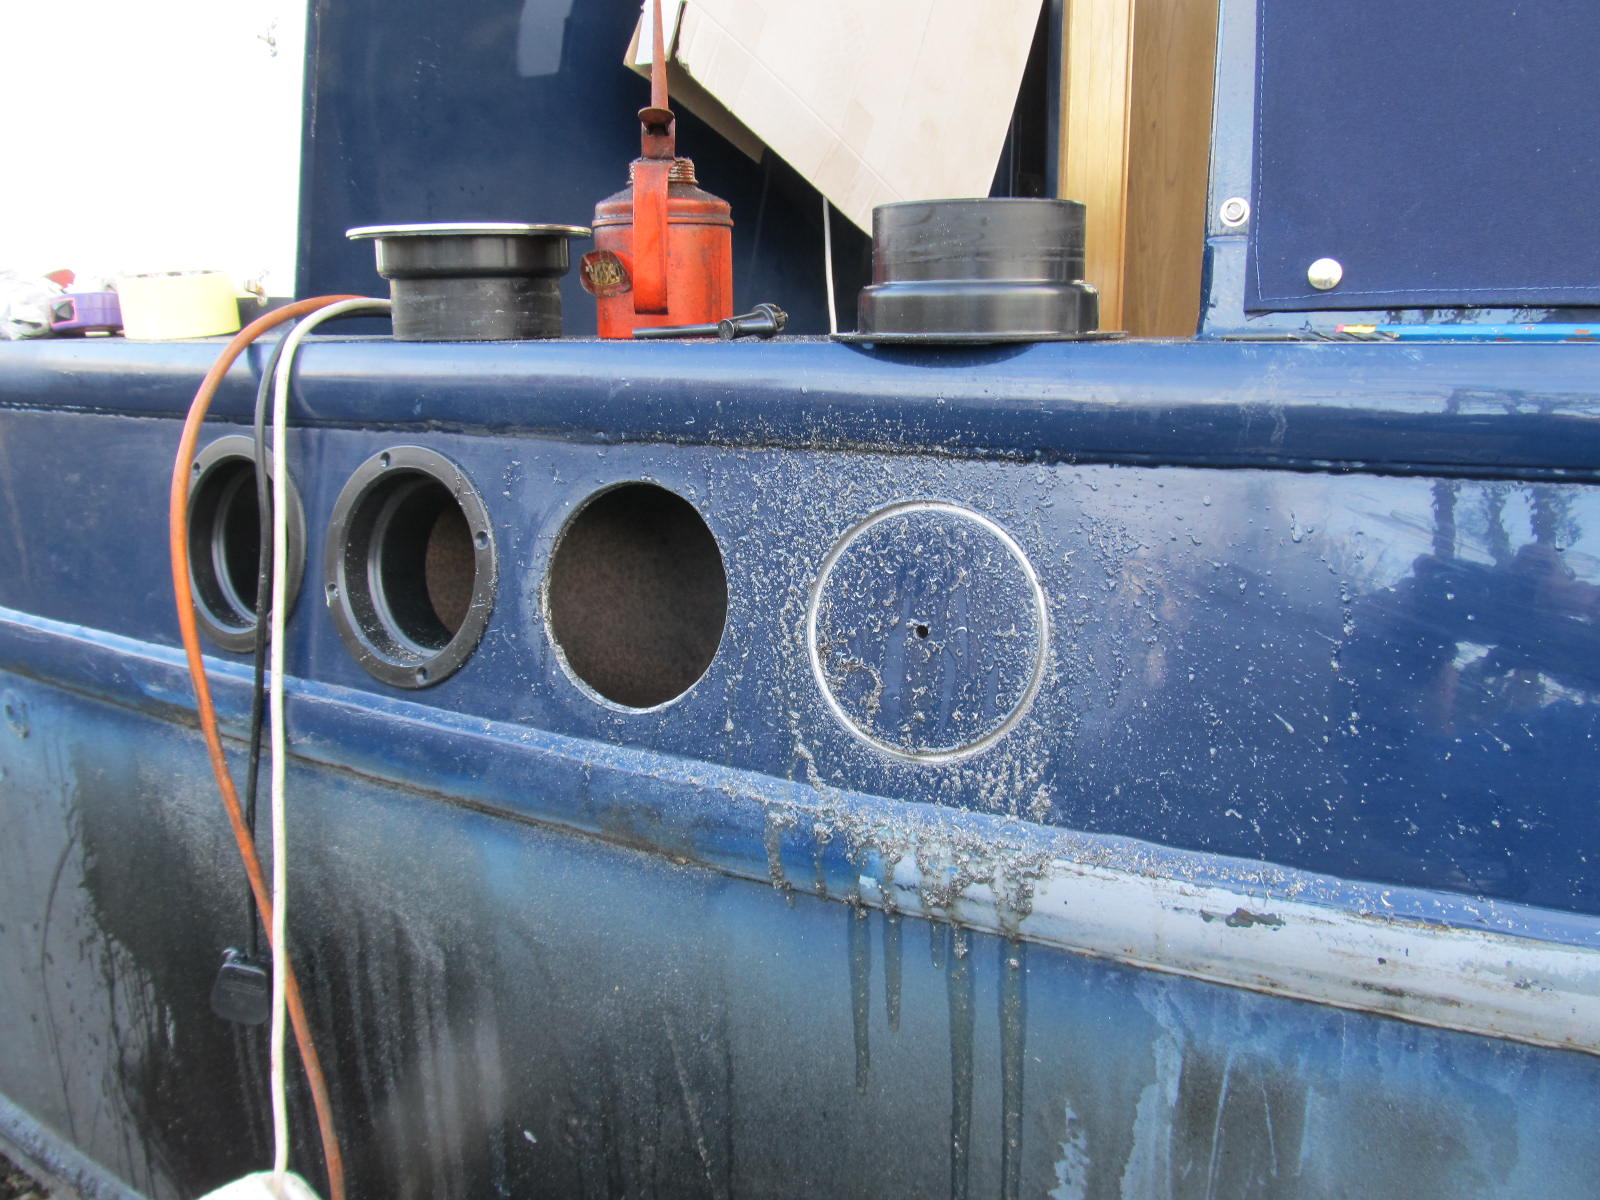
While he was busying himself with all thing wood inside I set too with another of those jobs I've been putting off.  Cutting the holes for the engine breathing.

The first thing to do was a dry run to see how it would look before committing to drilling.


Happy with the look of that I marked it all up then checked it, then checked it again then started drilling.


The plan was to drill right through with the 125mm hole saw.  I soon realised this was going to be a problem on breakthrough as I wouldn't be able to hold the massive slow speed drill I hired, so I modified the idea and went with drilling just over halfway through then using trusty plasma cutter to finish.

 Half cut and ready for plasma 

The holes receive the air intake spigots to which a 90° bend is attached to stop any water draining into the boat.  


But seemingly like all things there was a snag.  There's not enough room behind to accept them so another method to stop water entering needed to be devised.


As the part of the boat they are fixed to lays back a bit a barrier needs to be nigh enough to allow forward draining, so I made these smiley wedges which I will silicone in then make a silicone ramp at the lowest point to make it drain.  Photo to follow when done.

 Done

Tuesday 3 January 2012

Fuled Up

I have been getting a bit fed up with getting 40L of Diesel from my friend to run the central heating boiler (Mikuni) so I ordered a full tank full 600L.


I need to fuel it up at some point and while its on dry land its better just in case there is a leak.

I was confident it was going to be fine because of the pressure tests and it was. So once full I was able to calibrate the fuel gauge.

During the Christmas brake I finally found where the leaking water from the toilet tank was coming from.  Turned out to be from the hose where it connects to the pump out pump.  The jubilee clips couldn't put on enough force to squash the hose down so I fitted so I solved the problem with Superclamps


These were able to overcome the steel spiral reinforcing in the hose.

Over the Christmas break I was able to get some more oak trim up as well but eventually ran out of adhesive.  So I gave in and had a bit of time off.