Saturday, 11 May 2013

Alternator Modification


I've been having trouble getting my house batteries topped up and getting enough amperage from the engine alternators even though they are now paralleled.  Also we have an electric combi oven on board and the original idea was that the oven would run through the inverter powered entirely from the amperage supplied by the 12v alternators.


For some reason despite my best calculations this simply didn't pan out the way I anticipated, so the option was to replace the house alternator with one of a larger capacity.

A bit of digging around on good old ebay and I managed to find a 215amp alternator which is 100amps more than the one originally supplied as the house alternator.  It was also fortunate that the mounting spigot was the same 55mm as the original.  I’m thinking this might be some sort of standard.


This is what the alternator setup looked like originally.


The new larger alternator obviously requires a much larger belt to drive it due to the extra load, so I ordered it with a PK7 pulley. That was the easy part!

This extra load could not be delivered by the original single V belt and the ratio was not sufficient spin it at optimum speed in the cruise RPM range. 

I then needed to get the larger drive pulley. Originally I thought this would be a simple job of just getting one off the shelf as you can with many other types of drive pulley. However the PK standard of pulley seems to be specifically used in an automotive situation and the engine manufacturers make their own pulleys to suit.

This left me with no choice but to get one made. Once again Canal World Forum held the answer as one of the members Tim Leach of Dutton Dry Dock offered to make me one for me.

I was able to get RPM and charge data for the alternator and the max over speed rating from the supplier so I was able to work out the drive ratio. I settled on 4.5:1 as this would provide a very high charge at tick over and maximum charge at cruise revs of 1300rpm but would not over speed it at maximum RPM which in reality is never used. Knowing the small pulley diameter I worked out the large one needed to be 235mm

The first job was to get the existing pulley re-machined to take a 50mm shaft.  


This part was done by a local engineering firm as it needed welding which I did. The shaft was left long to allow for design as it had to be made up in situe. Once the design for the pulley was finalised all the parts were sent of to Tim.
As the actual belt alignment could not be predetermined exactly the best solution was to use a Taper Lock pulley and hub. This design permits the pulley assembly to be mounted anywhere on the shaft then locked off.


Old system alignment


A week or so later the pulley assembly was returned to me along with a couple of spacers I also needed. I somehow managed to lose the key which I suspect has fallen overboard so I scavenged for a but of scrap and armed with nothing more than an angle grinder and file I soon made another.


 This bit of scrap turned into the new key

All the modifications done

One thing I didn't allow for was the bolt heads sticking out from the hub face and the original ones that would have stuck out from the rear of the pulley and sitting on top of the shaft fixing bolts, so I had to use countersunk bolts instead necessitating the back of the pulley to have holes counter sunk.  


Thanks once again to Garth at The Boat Yard Ely for the use of his countersink and pillar drill.

This is what all the new parts look like.


I then bolted the new shaft into place.


Then I positioned the new pulley and hub assembly on the shaft. Only 9 x M10 bolts!


Having previously fitted and connecting the new alternator I fitted the belt, set the alignment then locked the new pulley to the shaft.


Job done!

So what has all this achieved?  Well I now have over 300amps of charge with the 2 alternators working in parallel.  This means I will be able to charge my batteries much quicker and more deeply.  There's a bit more this this as any battery expert will tell you. 

Also my electric oven draws roughly 220amps from the batteries via the inverter.  The basic maths on this is inverted power is 10v divided by the mains wattage. So 2200watts = 220amps at 12v out of the batteries.  10v is used to account for conversion losses.  It's not exact but it is pretty close and simple to do in your head. The previous setup wasn't quite able to supply this.  This means I can run my oven with the engine only and there's a hidden bonus in that any extra power from the alternators will go into the battery charging system so on initial tests I was running the oven and still getting a surplus 56amps of charge.  If the batteries are were even flatter there would be a theoretical 95amp spare available.

Conclusion is this has been a worthwhile modification. The next stage if necessary will be to add an external alternator regulator to increase the regulated charge voltage to 14.8v from the normal 14.4v  This is a better charge profile for my battery type.


One final note.  I did a rpm check with the engine running at a shaft speed of 1035rpm the alternator was spinning at 4565rpm so the ration calculations were pretty spot on.


Thursday, 2 May 2013

A Boaters Favorite Subject

Yeh toilets again!

Following the removal of the 230v toilet in favor of the 12v again I was left with a gap behind the toilet as I had to remove some extra wall to get the plumbing connected to the 230v one.


I made a template a week or so ago and my brothers stone firm cut and polished a cover plate out of a type of man made porcelain.


So why are there tiles missing on the lower left?  Well, first of all it was an accident of removing the skirting board but then it became apparent this was a fortunate accident as I have another problem that needs fixing and these broken tiles sowed a seed to part of the solution.

The rubber sanitary hose used to take the macerated waste to the holding tank which is sold a "Smell Free" is now after only a year leaching a nasty smell in the boat and needs replacing.  This was supplied by a an expert firm in the field.  When questioned about this I was told that basically all flexible sanitary hose will leach smell sooner or later.  This I find unacceptable and have taken it up with the supplier.  In all fairness to the supplier I don't think they are to blame as they only brand that which is available elsewhere.  Neither the less to be told this hose should be regarded as an item that will need replacing anywhere from a year onwards is just not on.  Plumbing as far as I am concerned is a fix and forget item!

So in order to get the old hose out and new one in access has to be got.  By removing the right hand bathroom cabinet:-


I was able to carefully remove 2 tiles to replace the damaged ones:-


Then using a borrowed Fein Cutter (Thanks Garth at The Boat Yard Ely) I gently cut through the board behind ensuring not to plunge any deeper needed to breakthrough because behind are plenty of services:-


As you can see!  I'm pleased to report nothing unintended was cut or even nicked.

So if anyone want's to buy me a pressie, a Feins Cutter will do.  In case you're not sure this is what one looks like.


Anyone??  

Thursday, 25 April 2013

Storage

This weeks theme on the boat has been about storage.  When we go to France we are going to need to store more equipment and stores.

I am going to make some storage bins and seats for the rear deck.  This is the template for the side ones then once these are made I will bridge across the back.  So we will get lots of storage and a nice social area to enjoy the better weather abroad (well hopefully). I will probably make a demountable table as well.


Next it was under the stairs to the stern.  Having cut the floor board under the bow steps some time ago and doing some temperature checks it was noticeably cooler all the time than the room air. 


This is how it was before and we do use it for storage.


Now the floor has been removed we gain an extra 125mm depth and a cold surface being the base of the boat.  This space is ideal for tinned drinks, wine and beer.  Probably not cold enough to drink but certainly a saving on fridge running being cooler than room temperature. Anyway it cost nothing to do so why not?

And the final bit of storage.  Sort of :-)


This is a crate for our new crew member - Herbie. 11 weeks old now.

Seen here in his home crate

And not forgetting his big brother

Teddy (with a sore paw) and Herbie

Hopefully we won't need to crate him for too long.  Some people don't like the idea of crates, but our experience is that a dog makes it his own space, they don't see it as a cage like we do.  To them its a bed and a den.   Toys get taken in and out and if left open they will happily go in for a nap.  


Saturday, 13 April 2013

A Bit Council House?

I have been up to quite a few things on the boat but nothing really blog worthy. I do have a lot to say about generators, batteries, alternators and charging but this is still a work in progress.

I have put the 12v toilet back in and fitted a better design non-return valve.


The 230v toilet was OK but had its issues, principally the amount of water used.  Since fitting this valve no backflow has been noticed.  The other issue I had with the 12v toilet was voltage drop on activation.  I have overcome this with a small sealed 12v battery in a cupboard very close to the toilet.

This was the original toilet swap blog.

It's a common joke in the UK that mounting a TV on the wall is a bit "Council House".  It just happens on the boat I decided it would be a good idea as it frees the surface of the unit.


Before

After

Much neater as all the wires are in the wall now.  The extra height is better, more comfortable viewing angle.  It was a bit low before.

Saturday, 16 March 2013

Happy "Floatday"

Well, one year ago today Avalon was gently lowered into the water.  Where did that year go?

Launch Pics again

 Well we've had a great year of cruising the Gt. Ouse waterways and meeting an making new friends. We have clocked up 187 hours which equates to about 750 miles covered. We have learnt how to mostly keep control on her. We've had friends come to stay, tried most of the pubs and restaurants on the riverside, and most of all enjoyed it more than we can say.  I have still managed to find things to tinker with a couple of days a week.   


Saturday, 23 February 2013

France Here We Come

OK not quite yet but we have the necessary qualifications to go.  Sorry to get you all excited.


Over the last month we have both been studying for the necessary qualifications we need to be in charge of our boat when we take it to France.

To be legal unless you are on a hire boat in which case you need no training, knowledge, experience what so ever! the master of the vessel needs to have a VHF radio licence, to know the CEVNI rules and demonstrate your competence to handle a boat, in our case over 10m, this is the ICC part.

We did the VHF first about 3 weeks ago on a day course.  This we both found very interesting, I especially liked the DSC part, but this is pretty useless on inland waterways accept for group calling or calling a known MMSI of another boat, a bit like a phone number.

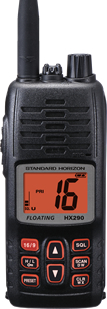
Once we had our license I bought a fixed radio and a handheld.  Two are recommended for France.  We chose models form Standard Horizon.  The fixed set also has GPS which is a bit of an overkill for inland waterways but it was only a small amount more and it gives speed and heading information as well as the time. The handheld is a just simple VHF only set.

This is the main set. But ours is in black


This is the handheld.


Once we had the VHF set it was then necessary to apply for Ship Radio License to get an MMSI number.  This was easily done online on the Offcom website and resulted in our own MMSI number 350974?? and our UK call sign 2GHQ6.  Part of this registration my personal details so the MMSI is tied to a user in case of emergency and I suppose misuse.  Once we are in Europe I will programme in a the ATIS

Then it was down to studying the CEVNI signs.  It's a bit like learning the highway code but for the river, except it’s not as well organised as it's (IMO) a bit of a dog’s dinner as it's compiled by bits from all over Europe.  As well as the signs there's also lots of different signs on various types of boat by day and night and differing in the type of vessels and what it’s doing.

This is the full CEVNI and here is a set of flash cards I compiled (with permission) from the initial work done by Bryan Griffin.  In the end the multiple choice paper was passed by both of us simply because we drilled ourselves with the cards for a good couple of weeks off and on.

Meet our new crew member MOB.


The practical part for the ICC Involved us taking our boat our with our examiner for the afternoon and demonstrating MOB (Man Over Board) recovery procedures and other boat handling and mooring skills as well as questions about river  craft, safety, emergency procedures.  Most of the handling was simply demonstrating what we do each time we take the boat out, but we did have to practise the MOB as we had never done this so  a good few ours were spent pirouetting around retrieving our very own MOB, yep a  buoy tied to a bucket.   The bucket acts as the simulated weight and sea anchor. Each time we practised this MOB it really got the adrenalin going.  Even though it was only a buoy and bucket it becomes so real.
Anyway, after that the instructor / examiner showing me my boat WOULD go backwards under control despite my insistence it wouldn’t and a final few questions he told us we had both passed.

I have also registered Avalon on the SSR and now sport the Reg. No.SSR1535623

I do have a massive blog to do on the very complex subject or Generators batteries and charging. I will get this done ASAP as I have learnt a lot with the help of Clive one of my blog readers.

Wednesday, 2 January 2013

Toilet Talk

It's a fact, when a group of boaters get together it's not long before the talk turns to one of several subjects and pretty much every time toilets will crop up.

Another topic is voltage drop, cable thickness, etc.  Well this bog blog post covers both.

It was my intention to have all essential services on the boat running on 12v.  These I figured were water pump, lights, central heating and toilet.  

Since being on the water we have had problems with the toilet back flowing into the bowl about 1 in 5 times this of course is more noticeable on "longer" visits.  Initially I thought it was the non return valve being faulty or damaged, but having serviced this and the macerator unit the problem still existed.  

As winter drew on I noticed that when the toilet flushed the lights would dim significantly on the initial start start of the flush cycle.  As the batteries are working harder this time of year the charge will drop to 80% overnight with the fridge freezer running.  It was noticeable that when I am on the boat alone the problem was less frequent as I don't bother with the fridge for a couple of days at a time which keeps the batteries up to 90+% overnight.  Also it eventually became apparent the problem was worse in the mornings where the batteries are at their lowest, so my thoughts turned to the performance of the macerator and in particular with all the clues the likely cause being voltage drop.

I tested the voltage after a good charge. At the main 12v distribution board 12.83v, which showed 12.37v at the toilet no load.  On start up the voltage dropped to 8.5v rising to 10.5v for the rest of the flush.  This was a water only test and of course would take less power to macerate than a "full" load.  This combined with the run being about 2/3 of the maximum recommended put the system under great strain.

Clearly this was less than ideal although I had used wire gauge theoretically ample to cope with the run distance and load.  My next idea was to run another wire of the same gauge which I did as a temporary.  This had very little effect, improving voltage by about .5v.  I then connected a well charged battery right next to the toilet with a cable run of the same gauge but only about 600mm long.  This proved highly successful with over to 12v being delivered right from the start of the cycle.

I was faced with 2 options, run a massive pair of cables to the toilet which would cause problems because I didn't have room for them without some major carpentry or abandon my original remit and use 230v for the toilet.  The latter choice won out.  OK, I know we are reliant on the inverter being on to flush the loo and if this went west we couldn't flush but in reality if the inverter packed up we still have the generator.  I have further made future emergency provision by using a standard 3pin plug and socket so I can if necessary connect a small inverter to the original 12v supply and simply plug it in to there.

The fitting of the new 230v toilet has necessitated some butchery of my original neat installation.

This is what it looked like from behind before, 3 nice neat holes through the wall.


This is what it looks like now. Power was easily available from the sockets that supply the AV equipment.

Not quite so neat but effective

And with the new toilet all fitted.  No sight of the hole now.


Initial tests are encouraging!  Certainly the flush is much more powerful.  The flush is now by a button on the side of the toilet which is not what I expected from the details.  I still have the 12v toilet panel just visible at the top of the photo.  I'm going to see if this can be connected to the control in the toilet as its more convenient and I won't have to devise a cover for the panel & hole.

Once I'm happy with it all I will bolt it down securely although as it is it's pretty stable and usable.