Wednesday 26 January 2011

A Cover Up

It has become apparent that I am not going to get my engine bay dry with the temporary decking I have so drastic measures were required.  

This morning was totally windless so today was the day.

I have self draining decks but as reported in the past they don't drain due to surface tension and as the boards get wetter its getting worse.  So..........

Wood frame built a week or so ago


Once I trimed the wood up I put the cover on.  This cover was so heavy I could barely lift it.  It took me just under 2 hours to wrestle it into place.


After this I pumped out the engine bay and dried it up.  All being well in the morning I will be able to start painting it AGAIN!

I have so much to do in this area I just can't wait for spring or rely on it staying dry enough long enough to make progress.

First thing to do is sort out the leak in the port fuel tank.  Makes me wonder how the hell the builder of the lower hull thought they could get away with this. Either they never tested the tank, or did and chose to ignore it.  Either way its going to be a sod to sort out.


Monday 24 January 2011

Shower Installation

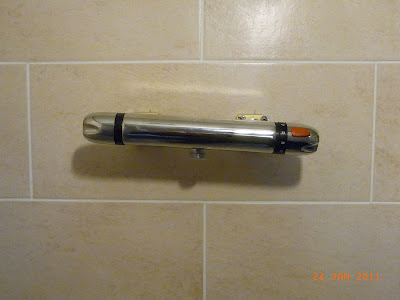
I finished installing the shower today.  First I fitted the mixer bar. The fixing kit supplied with most bar mixers are rubbish and making a nice job of fitting one can be a pain in the butt.  Looking for a better way I came across this.  Mira Fixing Kit  It makes it easy to fit the bar mixer both at the 150mm centers and level as its set up so that the chrome parts turn eccentrically.


This is with maximum offset

Set level and at 150mm centers

The kit is expensive and I did do it OK when I did the motorhome shower room but I would whole heartedly recommend one.  Screwfix do it for £19.95 so a lot cheaper than direct from Mira.

With that done all that was left to do was fit the riser and the shower doors.


A quick wet test showed no leaks.


And so with a shower tray full of water it was time to test the Whale Gulper 220 and plumbing.

Spurty!

The plumbing was all sound and the Whale is surprisingly quiet.  I can see why its called a Gulper now though.


Sunday 23 January 2011

Flushed With Sucsess

As usual there were problems to overcome when it came to connecting up the toilet.  The plastic fitting from the toilet to the outlet pipe was too long to fit in the cavity of the lounge/bathroom wall.  This is how it is as standard.

50mm to long


It needed to turn 90ยบ immediately it leaves the rubber fitting from the toilet.  So I got a 1¼" waste elbow which the outside diameter was fine for the rubber fitting, but to narrow on the internal diameter to accept the toilet fitting.  This needed to be stretched which meant heating and softening the elbow to allow me to force in the toilet fitting.  Solution was to heat up some cooking oil and lower it in for a few seconds.


I forced in the toilet fitting and immediately cooled it with cold water.  The result was a perfect fit.  After a through clean up I solvent welded the toilet fitting into the elbow and to beef up the other end I put a shot length of waste pipe into the elbow to give more to clamp on with the jubilee clip.

If you look closely you can see where stretch ends

Modification done it was time to fit it all together.


To get it all inside the cavity I even had to cut a space for the jubilee clip screw to sit inside the plywood of the bathroom wall. It's that tight!  The white behind it is the back of a tile.

Plumbing and electrics all connected it was time to test......................... Nothing!  I checked all the connections all seemed OK so toilet out again and opened the electrical box and found the multi plug had simply become detached from the circuit board.  I put it all back together and refitted the toilet and...................

It works


Thursday 20 January 2011

My Head Hurts

Two way light switching.  Looks simple and is when you've done it.

This is the diagram I used, there is another way as well

The bedroom was easy as this is a simple loop, however the lounge was a bit harder as I have the wiring running in a 2 spur system to save cable runs.

As you can guess I have been doing some wiring today.  The bathroom is now fully wired. The bedroom and the lounge area have their primary lighting done now and will get their secondary lighting done when the ceiling goes up.  There will also be complimentary lighting under the gunwales and around plinths and stairs.


Monday 17 January 2011

Bathroom Wiring

Today I connected all the wiring for the bathroom.  The Whale draws 5 amps and I could have run this straight through the pull switch, but this would be near the limit of 6 amps on a pull switch designed for 240v AC so decided to relay the power.  The relay is just above the pump.  I did consider having the pump operated by a flow switch but decided to work on the principle of keep it simple.


The ceiling fan is 12v AC for safety in the bathroom.  This is supplied by the transformer from a 240v supply and is housed in the what box to the left.  As I want this to turn on with the lights and it is designed for 240v switching it was necessary to put a relay in the box which is energised when the lights are switched on.  The extractor is on a timer so a flick of the switch in the day time will make it run for 15 minutes.  I might put a night override in if it proves to be annoying during night visits to the loo.
The 12v relay

I have left enough cable slack to enable servicing to all parts.  This is what it looks like with the cabinets in position.


I also fitted and wired the ceiling lights and drilled the cabinet which will take the sink for the plumbing.

 Its taking shape

Friday 14 January 2011

Bathroom Update

The bathroom units came a couple of days ago so it was time to get on with finishing the plumbing and wiring for the bathroom.


So I have 2 more holes in the starboard side, 1 for the shower outlet (blue/white tube) via the Whale Gulper 220.  I chose this pump as it is held in high regard by fellow users either those that chose it, or those that have it as part of their boat equipment by default.  Also its easy to dismantle if it should get blocked.  Access is going to be tight so this was important for servicing and / or removal.  It will be under a unit behind the plinth.

 The Whale is fixed to a ballast slab

The other hole is gravity outlet for the hand basin, just the spigot is showing for now and the white ones are hot and cold water supply.

The bunch of wires are for the Whale and switch via a relay, power for the toilet and wiring for the extractor fan.  The white box is the 240v - 12v transformer for the extractor fan.

The dark wood arris rail is to support the back of the units


Friday 7 January 2011

More Plumbing

I decided to have a secondary method to heat the boat just in case the diesel heater plays up for some reason as they have a habit of doing, although with the increasing amount white diesel becoming available on the waterways this should be less of a problem.  Also it will provide a focus and could be used just to "take the edge off" without firing up the full CH and its quick start and stop. I also wanted to  use a different fuel so that ruled out a diesel stove.  I considered a multi-fuel stove but to be honest I can't be doing with all the phaff and mess so decided to fit a gas stove in a multi-fuel style instead.  I will be carrying gas anyway so seemed the logical choice.  I'd rather carry a bottle of gas than wood or coal to the boat.

All the charm of a wood fire without the phaff

I have laid a 15mm gas supply for this and also left a spur for the cooker.  Once again my trusty pressure test gage was put to the test.  Glad to say the soldered joins and pipe are happily holding 2 bar for over a day now.

The fire will supposedly run at full setting for 40 hours on a 13kg LPG bottle with an output of 3.9kw.

Wednesday 5 January 2011

Central Heating Test

On new years day I filled the CH system with water and bled it up as you would do in a domestic system The only difference here was the boiler was not in the system.  Ideally I would have liked to used a water pressure pump to load the system but couldn't beg borrow or steel one so I used compresses air instead.

Loaded to 3bar

I knew this would go down as the air dissolved in he water and the system stretched. After a couple of days it settled down to 2 bar and this morning when I started work on the boat it was still at 2 bar.
Satisfied the system was not leaking with this reading and that no water stains were found I am confident the system is sound.  Hopefully this will be so when its hot.

After draining the system (well blowing it out with compressed air at 150psi) it was quicker! I decided to see if the Calorifier would fit.  I had it made to the maximum hight I had available so it was time to see if I'd been over confident.  I must admit I was concerned.  

It just fitted in....... really JUST!

Please ignore my disgusting engine bay area.  I have repainted it once but as my decking is temporary its not fully self draining.  I am trying to get a firm to come out an make a pram hood but they just won't come this far out.  I am resolved to leave it until the weather warms up but it needs sorting before the engine goes in.

With the calorifier in place I marked up for the cold supply and hot out pipes.  I have now plumbed this up.


Saturday 1 January 2011

Happy New Year

Happy New Year to you all.

I just looked at my Stat. Counter and see its just gone over the 20,000 hits.

Thanks for reading.